Have questions or want to discuss cycling? Join Now or Sign In to participate in the BikeRide community.

New: Take Part in the March Giveaway: Coming Soon 3/24


My "ride"
#21
(09-21-2010, 11:40 AM)rbeggy Wrote:  . . . Additionally, I got the VERY stuck freewheel removed. It took about 3-4 days of attempts. I tell ya what, the chain whip tool from park with the sprocket remover (SR-1) was worth it's weight in gold. I tried everything on that and finally it took two of us cranking in opposite directions to get it free. . . .

Looks like a GREAT start! I like the hammered paint but have not used it for a bicycle yet. Yours looks good.

As far as the freewheel removal, Bill and I both have made good use of a bench vise in cases where a freewheel is stuck. I have a 30+ y/o Raleigh that seemed like the freewheel was welded in place. I inserted the FR-2 (I think it was) and then placed it between the vise clamps. I then used the wheel rim for leverage to loosen the thing with success. Smile

A bench vise is a great tool to have handy.

Steve
Junkyard Tools rescued from the junkyard!
  Reply
#22
Originally this bike is made by the company " Boss "... Where it's made and the specs on it is any ones guess.

I can't find anything on their bikes on the net let alone this bike.

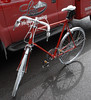
It was white pearl in colour originally.

After having it for about 3 years, last winter I decided to re-do it. Stripped everything down, sanded, primed, and repainted.
Gas sucks... Ride a bike
  Reply
#23
(09-02-2010, 12:05 PM)rbeggy Wrote:  So, here’s the scoop…

May – 2010 I bike to work once to see if it is a feasible way to work out. I did this on a used Next, All-Terrain Pro mountain bike with sidewall damaged MB tires (5-miles one-way)…

How I made it three weeks on these tires is shocking. After they gave out I purchased a set of Road Geax with thick tubes and liners. I was also rather proud of the WD-40 “BATH” I gave everything that moved… sigh.

June I finally decide that if I can commute 5 days a week on the MB then I can start thinking about an upgrade. I pulled it off. I start to investigate bikes and by the end of July I purchased my Specialized Secteur. I’ve since canceled the car insurance and if I can make it through the Florida version of a winter commute then I will sell my car.

After getting hooked on this narcotic you all call cycling, I decided to take apart and repair the MB. After all I’m the son of a Carpenter… How hard could this be, right?...

Yeah, I ate those words 1 hour into the process. I stared at a chain for an hour looking for the non-existent quick release…

I’ve learned my lesson but that won’t stop me. My plan is to:

1) Gut the bike to the frame

2) Strip, prep, prime, paint, & clear coat the frame, handlebars, stem, etc.

3) Take everything apart within reason (shocks, derailleurs etc are out of my league for now, but they are coming off the bike). I’m rather pleased to add, I just overhauled the wheel hubs.

4) Clean and grease/lubricate/oil everything.

5) Rebuild the bike with a few replacement parts (new seat, grips, pedals, shifters, cables, bearings, proper MB tires, and potentially a new bottom bracket).

I’m starting this thread as the “Before.” Depending on the cost, I plan to have a completely re-built mountain bike in 6-12 months. So far I’ve been able to do everything solo by using the videos on bikeride.com and a few borrowed tools from fellow bicycle junkies. Wish me the best folks… I’ll need it.

So, here's my "ride"


Ryan

PS. I could use some help with the name. Painting it a crackled black & grey

PPS. Having trouble with the picture upload, so if this doesn't work, I'll try again later.

Sounds like a big project. But it's worth in in the end. Smile
Gas sucks... Ride a bike
  Reply
#24
(09-02-2010, 12:05 PM)rbeggy Wrote:  So, here’s the scoop…

May – 2010 I bike to work once to see if it is a feasible way to work out. I did this on a used Next, All-Terrain Pro mountain bike with sidewall damaged MB tires (5-miles one-way)…

How I made it three weeks on these tires is shocking. After they gave out I purchased a set of Road Geax with thick tubes and liners. I was also rather proud of the WD-40 “BATH” I gave everything that moved… sigh.

June I finally decide that if I can commute 5 days a week on the MB then I can start thinking about an upgrade. I pulled it off. I start to investigate bikes and by the end of July I purchased my Specialized Secteur. I’ve since canceled the car insurance and if I can make it through the Florida version of a winter commute then I will sell my car.

After getting hooked on this narcotic you all call cycling, I decided to take apart and repair the MB. After all I’m the son of a Carpenter… How hard could this be, right?...

Yeah, I ate those words 1 hour into the process. I stared at a chain for an hour looking for the non-existent quick release…

I’ve learned my lesson but that won’t stop me. My plan is to:

1) Gut the bike to the frame

2) Strip, prep, prime, paint, & clear coat the frame, handlebars, stem, etc.

3) Take everything apart within reason (shocks, derailleurs etc are out of my league for now, but they are coming off the bike). I’m rather pleased to add, I just overhauled the wheel hubs.

4) Clean and grease/lubricate/oil everything.

5) Rebuild the bike with a few replacement parts (new seat, grips, pedals, shifters, cables, bearings, proper MB tires, and potentially a new bottom bracket).

I’m starting this thread as the “Before.” Depending on the cost, I plan to have a completely re-built mountain bike in 6-12 months. So far I’ve been able to do everything solo by using the videos on bikeride.com and a few borrowed tools from fellow bicycle junkies. Wish me the best folks… I’ll need it.

So, here's my "ride"


Ryan

PS. I could use some help with the name. Painting it a crackled black & grey

PPS. Having trouble with the picture upload, so if this doesn't work, I'll try again later.

your frame would like nice blinged up because i could see some nice features on it - square chain stays and trek-style seat stays.
  Reply
#25
So, here it is. I finally did it. I still have one last purchase to make. I need a new saddle.

[attachment=1669]

I'll try to get a better picture in the daylight. However the grand total for this project cost me around $85.00 and worth every penny. Prior to the rebuild, I purchased new tires, tubes, and tuffy liners.

15 - new bar ends (Profile design boxer)
5 - Grips
10 - New chain, cables and housings (Shop hook up)
10 - New entire set of bearings & grease
20 - New Rapid Fire Shifters
25 - Spray Paint

What a project though. I took everyone's advice and used all of it. Very much appreciated. Seriously, I can't thank you guys enough.
  Reply
#26
Dang man! Your bike looks sick now! I want to see a picture of it out in the sun. Let us know how well it rides after a while.
  Reply
#27
Nice job, what shifters are those?
  Reply
#28
Yes very nice job!
Good maintenance to your Bike, can make it like the wheels are, true and smooth!
  Reply
#29
Wow. Nice work mate!

Looks pretty solid, and for what is about £50 over here is a bargain!

Oh and don't worry about trying to service those forks in the future, they look like old RSTs to me, and thus won't have any serviceable parts, but they look like they have decent seals so they will work a lot better than the ones you get on cheap bikes now. If you're just commuting to work you won't really need suspension anyway.

Nice work though, the paint job is very well done!
  Reply
#30
(11-03-2010, 09:00 PM)rbeggy Wrote:  So, here it is. I finally did it. I still have one last purchase to make. I need a new saddle.


I'll try to get a better picture in the daylight. However the grand total for this project cost me around $85.00 and worth every penny. Prior to the rebuild, I purchased new tires, tubes, and tuffy liners.

15 - new bar ends (Profile design boxer)
5 - Grips
10 - New chain, cables and housings (Shop hook up)
10 - New entire set of bearings & grease
20 - New Rapid Fire Shifters
25 - Spray Paint

What a project though. I took everyone's advice and used all of it. Very much appreciated. Seriously, I can't thank you guys enough.

good end result fella.
  Reply
#31
Thanks everyone!

The shifters are Shimano Acera's btw. I took some better pics this weekend and will post them soon. The earlier shot was shortly after I finished it at 0'dark o'clock.

-ryan-
  Reply
#32
Dang! How do I miss these threads? Maybe I need to check in more often.
rbeggy, that is a good-looking build! Acera shifters of today are great. I had some STX (todays Deore) way back that were not as crisp as the Acera.

It's been almost 12 hours! Where are the pics???
Wheelies don't pop themselves. (from a QBP fortune cookie)
  Reply
#33
That paint job is great. Really dig the color.
Is this not a reasonable place to ride?
  Reply
#34
Nice work, the finished bike looks great and a new saddle will really top it off. Great job on the paint, you used rustoleum? Rattle can finish? I can never get a rattle can finish that smooth, very nice work.
  Reply


Forum Jump:

[-]
10 Latest Posts
Santini fluted frame
Today 01:39 PM
Expensive bikes with crappy wheels
Today 10:15 AM
Where are you from and What is your favo...
Yesterday 11:43 PM
2007 Trek Pilot S.P.A. 5.2
Yesterday 07:06 PM
2010 Specialized Hardrock
03-26-2024 09:16 PM
1990 Specialized Rockhopper How to Fluff...
03-25-2024 07:05 PM
Thread busted on right pedal crank
03-24-2024 08:52 PM
Trek domane tyre
03-24-2024 05:48 PM
Modern rims crack at spoke holes
03-24-2024 05:32 PM
Cup & Cone — Simple & Durable or PITA & ...
03-24-2024 04:53 PM

[-]
Join BikeRide on Strava
Feel free to join if you are on Strava: www.strava.com/clubs/bikeridecom

[-]
Top 5 Posters This Month
no avatar 1. Painkiller
21 posts
no avatar 2. ReapThaWhirlwind
16 posts
no avatar 3. Jesper
16 posts
no avatar 4. GirishH
15 posts
no avatar 5. meamoantonio
15 posts